Chapter 13: The Timeline Editor
Use the Timeline Editor to cut out parts, add zoom-ins, mosaics, text and motion graphics, change the subtitle style and aspect ratio, and export an MP4.
Chapter 13: The Timeline Editor
The Timeline Editor is Scribis's video editing tool. You can "edit your video by looking at the subtitles": cut out mistakes, add zoom-ins, hide personal information, add titles, and then export the finished video.
How to open it: in the subtitle editor, click Timeline Editor at the top (only videos have this button). Videos you've edited can be found again later in Cuts › Recent edits in the left menu (Cuts is the list of all your editing projects; see Chapter 10).
Two words to know first:
- Track: one of the horizontal strips on the timeline. Each holds one kind of thing (subtitles, cuts, mosaics…).
- Playhead: the blue vertical line on the timeline that moves during playback and shows where you are. Effects you add are placed at the playhead.
First edit: 5 steps
- Press the space bar to play, and press it again to pause where someone makes a mistake.
- Find ✂️ Add Trim Deletion Block in the button row under the canvas and click it. A red block appears on the timeline.
- Drag the red block's left and right edges to cover the part you want to cut.
- Want a close-up? Move the playhead there, click 🎯 Zoom, then drag the purple box on the canvas to set the area.
- Click Export MP4 at the top right to export the video. When it's done, click Apply & Save, which saves and closes the editor.
Each part is explained in detail below.
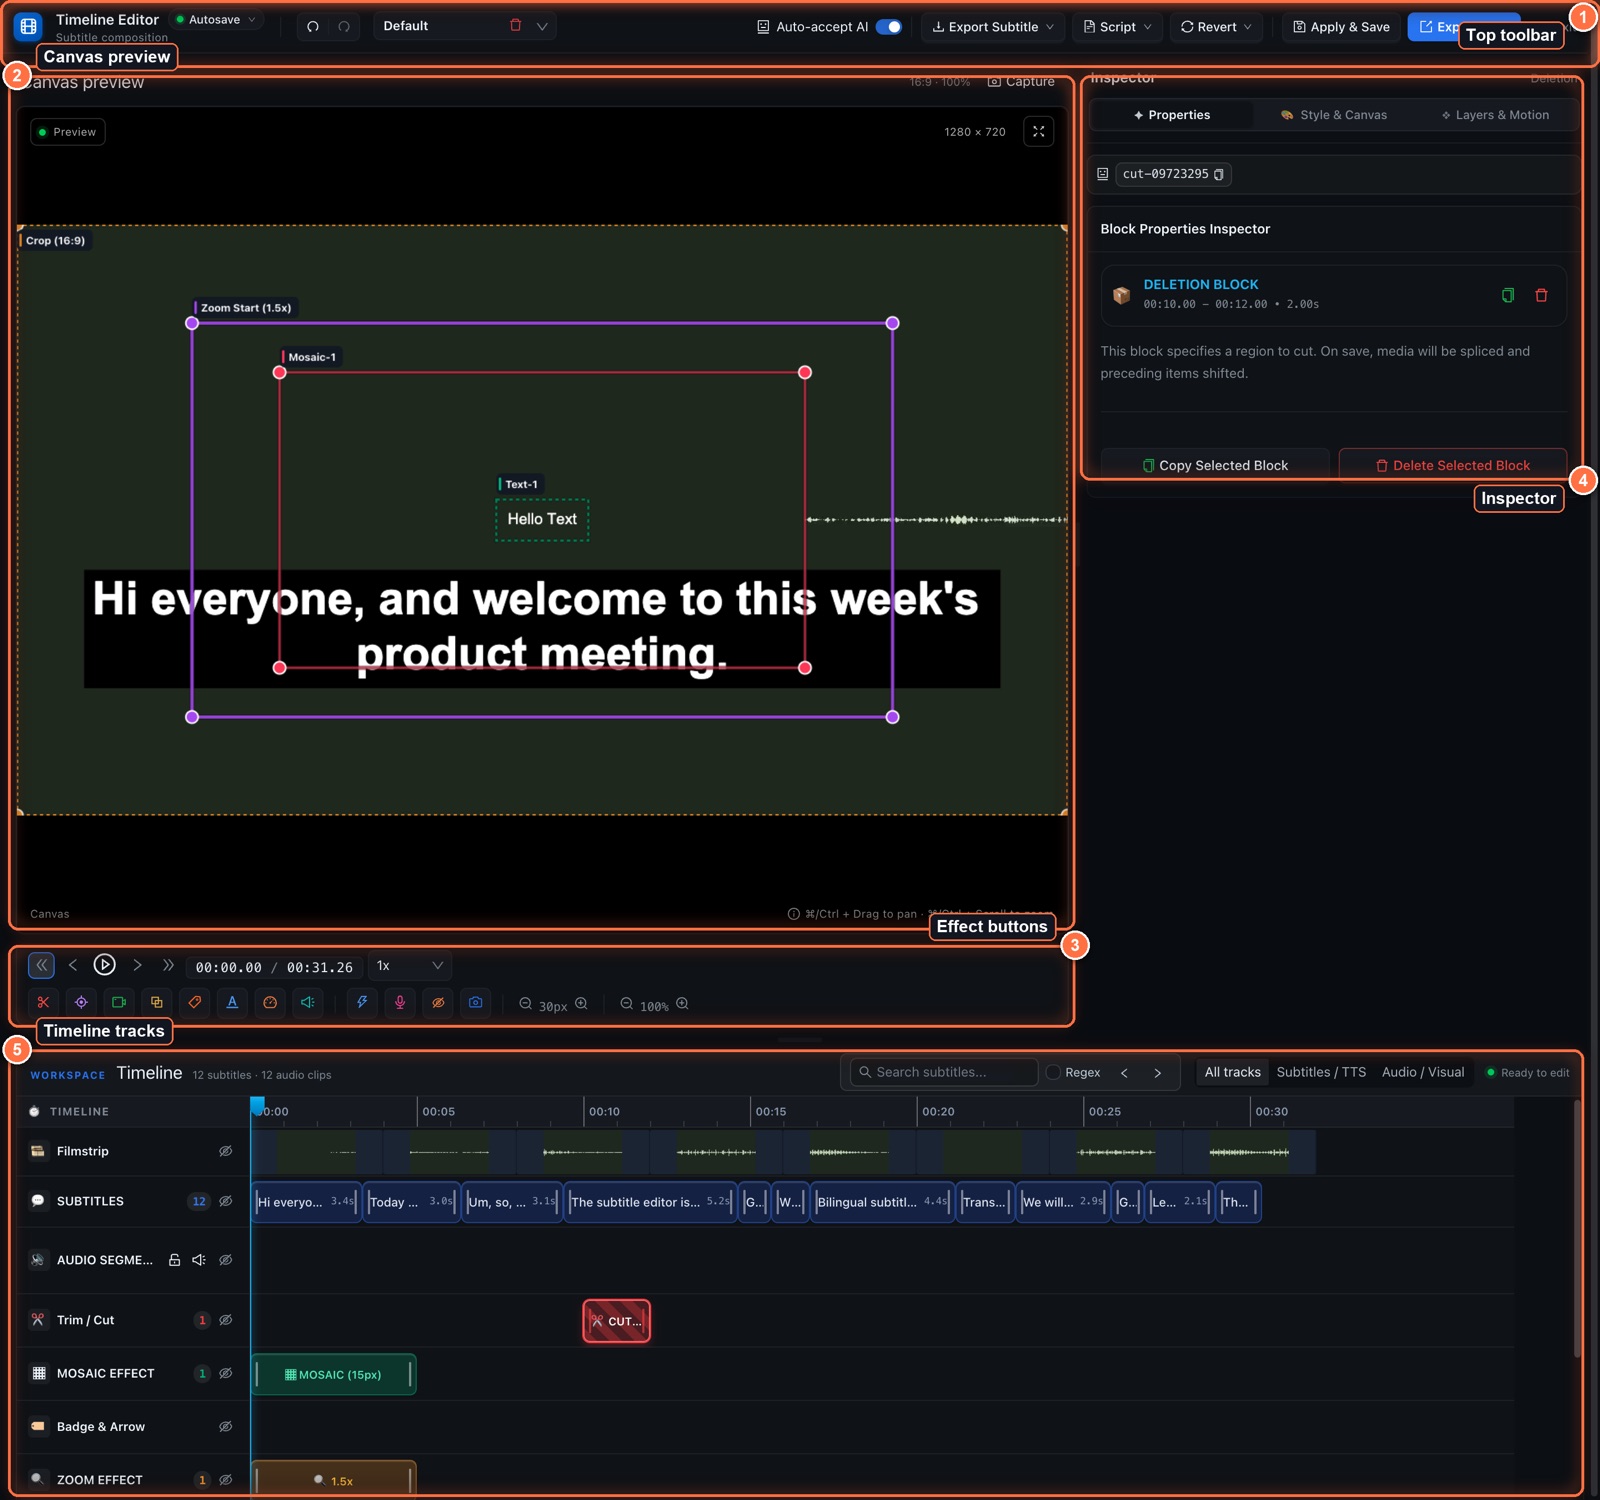
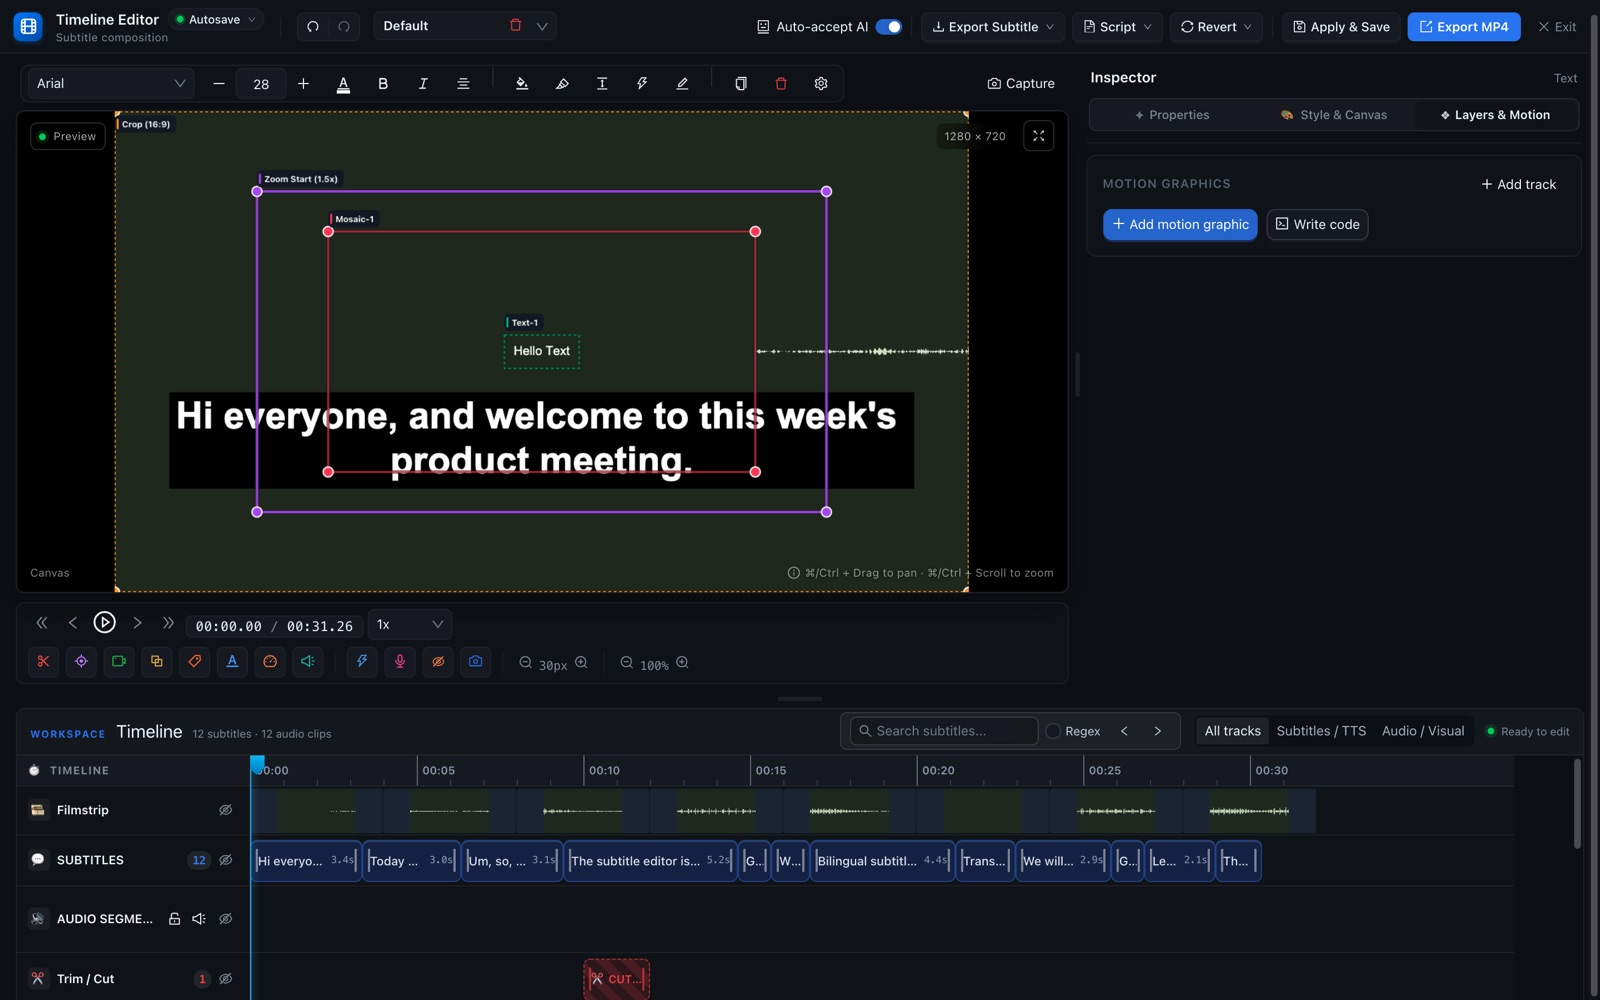
The screen has five parts:
- Top toolbar: saving, exporting, undo and so on.
- Canvas preview: what the final video looks like. You can drag things around right on it.
- Effect buttons: the row of buttons under the canvas, for adding cuts, zooms, mosaics, text and other effects.
- Inspector: whatever you select, you adjust it here.
- Timeline tracks: stacked strips called "tracks", each holding one kind of thing (subtitles, cuts, mosaics…).
(The orange numbers in the picture match 1–5.)
13.1 The top toolbar
From left to right:
| Button | What it does |
|---|---|
| Autosave | Saves about 1 second after each change. Click it to see the status, turn autosave off, or click Save Now |
| Undo / Redo | Go back a step / redo it |
| Select config... | One video can have several saved edits (for example "full version" and "highlights"). Switch or delete versions here; Save as New at the bottom of the list saves a copy |
| Auto-accept AI | Only matters if an outside AI tool such as Claude Code edits your video for you (Chapter 11). When it's on, the AI's changes are applied straight away; when it's off, you accept or reject each one. If you don't use one, you can ignore it |
| Export Subtitle | Exports just the subtitle file (SRT and so on), with the same formats as Chapter 4, section 4.6 |
| Script | "Script" here means a backup file, not code. Export Script saves the whole edit as one file; Import Script loads a file you saved before |
| Revert | Reload Subtitles and Reload Voice go back to the original subtitles or voice; Reload All State clears every editing effect and cannot be undone, so be careful |
| Apply & Save | Saves and closes the editor (so if you want to export the video, click Export MP4 first) |
| Export MP4 | Exports the edited video (see 13.7) |
| Exit | Leaves the editor |
⚠️ Make sure you've saved before leaving. With autosave on, Exit saves first and then leaves. If you've turned autosave off, or haven't saved any version yet, clicking Exit loses this session's changes. If in doubt, click Apply & Save.
13.2 The canvas preview: adjust things right on the picture
- Select: click a piece of text, a mosaic or a zoom box on the picture to select it. Drag to move it, and drag a corner dot to resize it.
- Edit text: double-click text to type straight into it. Press
Enterto finish orEscto cancel. - Zoom or move the canvas: hold
⌘(Windows:Ctrl) and scroll to zoom; hold⌘and drag to move the view. Double-click an empty spot to go back to normal. - Orange dashed box (Crop): the area that ends up in the final video. If you switch to vertical 9:16, anything outside the box won't be in the result.
- Capture: grabs the current frame so you can circle things and add notes, then copy it for an AI assistant to look at.
While paused, the picture shows editing boxes (such as Zoom Start, Mosaic-1, Text-1). While playing, it shows what the finished video looks like.
13.3 The tool row: add effects
Under the canvas are the playback controls and the tool buttons:

Playback controls (left): back 10 seconds, previous frame, play / pause, next frame, forward 10 seconds, and playback speed (affects the preview only).
Add effects: first move the playback position to where you want the effect, then click a button. A block is added at that spot:
| Icon | Name | Effect |
|---|---|---|
| ✂️ Red scissors | Add Trim Deletion Block | This part of the video gets cut out |
| 🎯 Purple target | Zoom | Zooms in for a close-up; you can set where it starts and where it moves to |
| 🎥 Green camera | Multi Cam | Splits the picture into several shots, for example one person on top and one below in a vertical video |
| ⬛ Yellow square | Mosaic | Covers an area (a number plate, personal details, a face) |
| 🏷️ Orange tag | Badge / Arrow | Adds numbered circles, arrows or boxes to point things out |
| A blue | Text | Adds a title or a caption |
| ⏱️ Gauge | Speed (0.1x - 16x) | Speeds this part up or slows it down |
| 🔊 Speaker | Audio Mix (0% - 200%) | Changes the volume of the video's own sound here (for example mutes it) |
Automatic tools (right of the divider):
| Icon | Name | Effect |
|---|---|---|
| ⚡ Lightning | Auto Trim | Cuts out every gap between subtitles, removing pauses in one click |
| 🎙️ Microphone | VAD Trim | Uses the sound to work out where nobody is really speaking and cuts only those places. It cuts less than Auto Trim, leaving more natural pauses |
| 🙈 Eye | Auto Mosaic | Finds email addresses, API keys, phone numbers and web addresses in the picture and blurs them automatically. To blur faces, first install the face detection engine in Settings › Experimental › Face Mosaic |
| 📷 Camera | Speaker Camera | Points the shot at whoever is speaking (needs a horizontal video, and the face detection engine installed first in Settings › Experimental › Face Mosaic) |
⚠️ Auto Trim and VAD Trim replace all the cuts you added by hand.
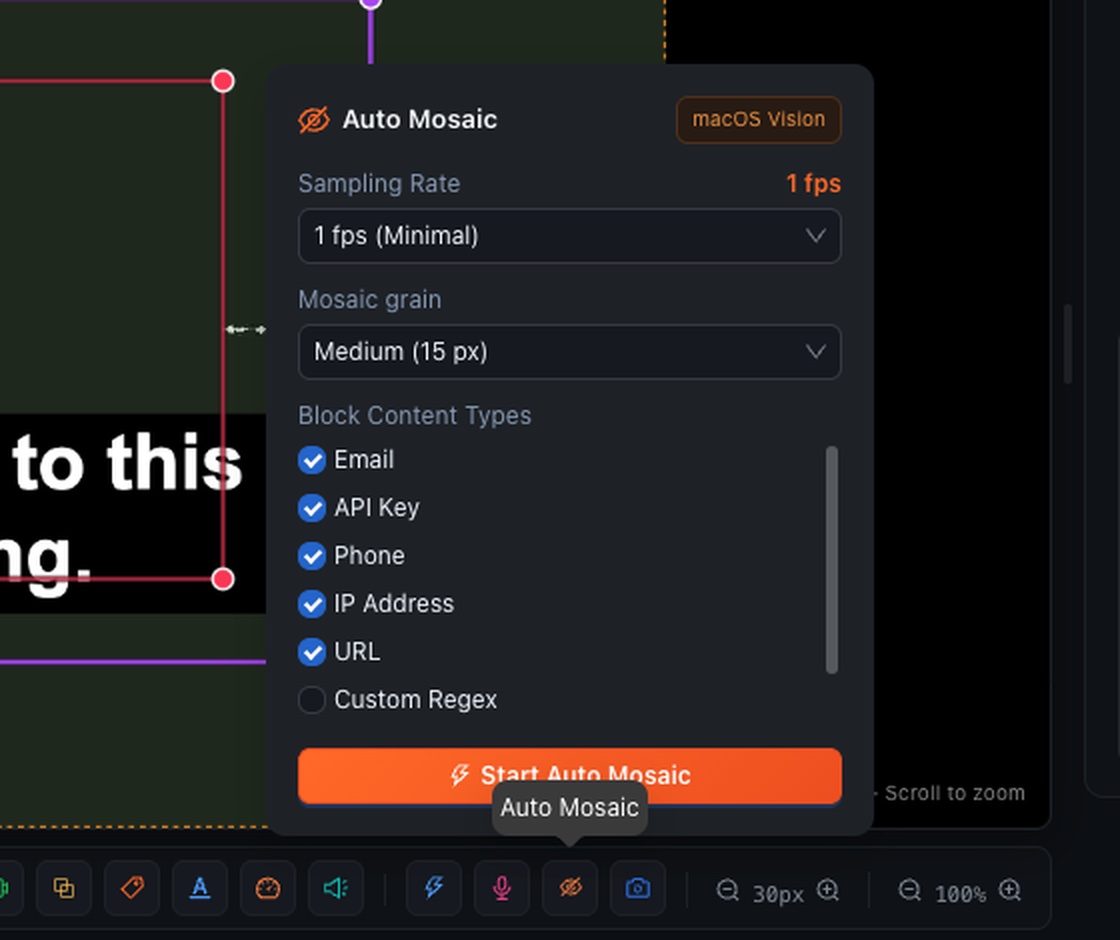
On the far right are two pairs of zoom buttons: the 30px pair zooms the timeline in or out (see more detail or more of the video), and the 100% pair zooms the canvas in or out.
13.4 The Inspector: adjust what you've selected
The Inspector on the right has three tabs.
Properties
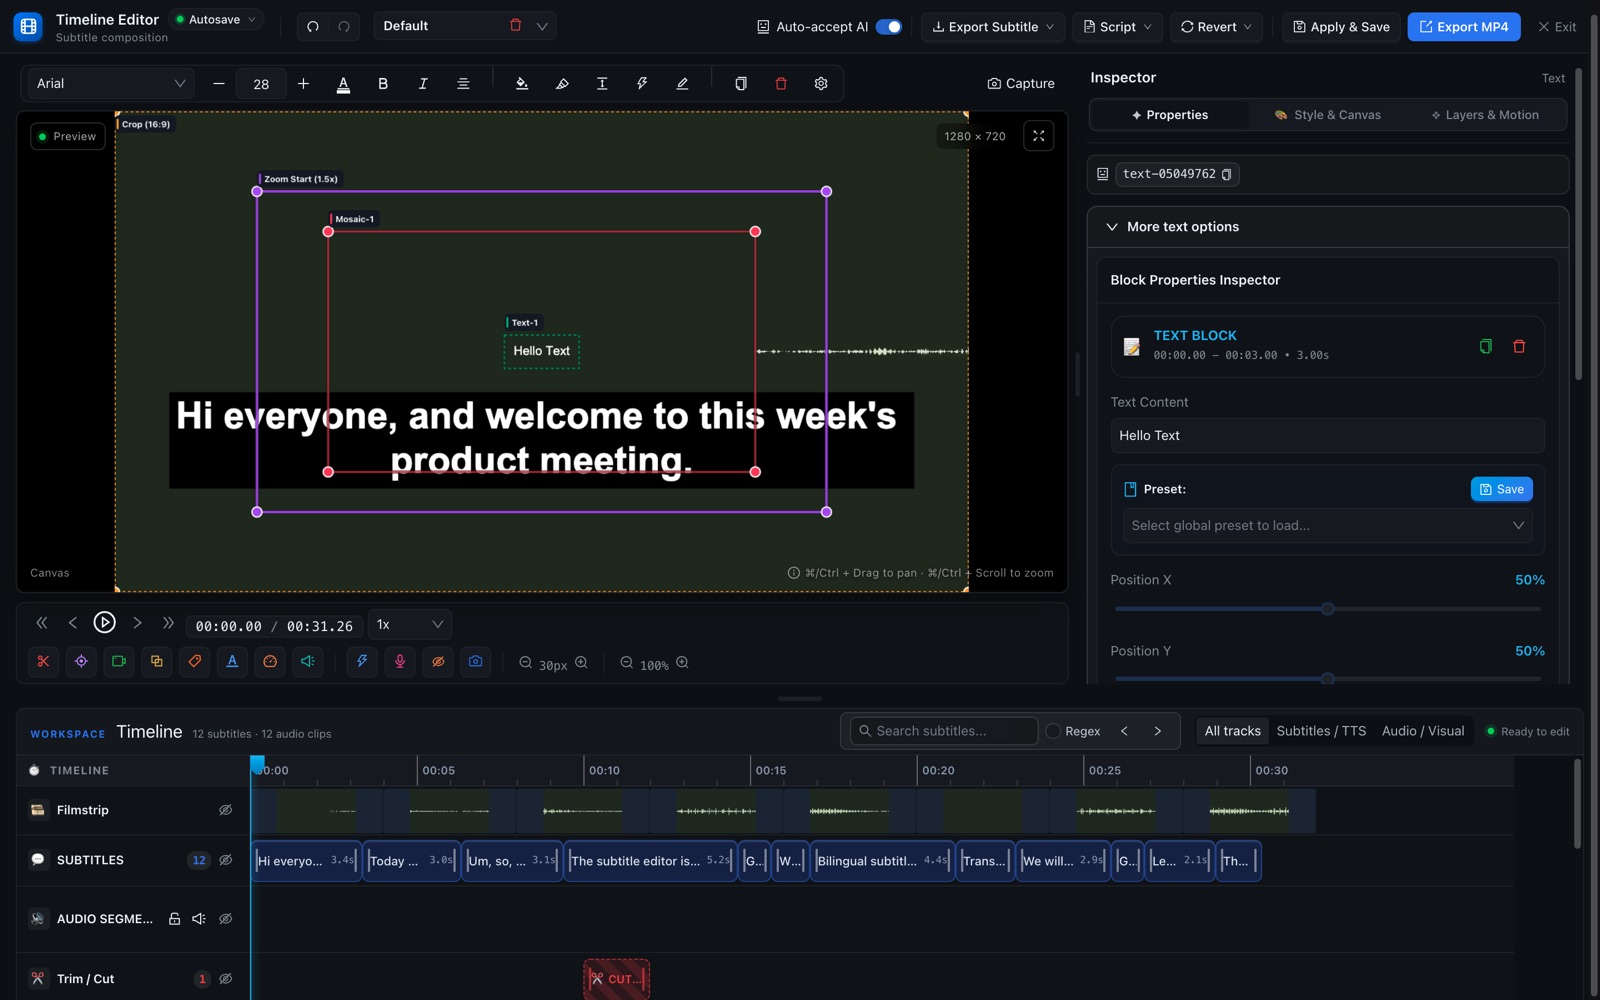
Select any block and its settings appear here, for example:
- Text: the text, position, font size, color, animation effects (click Browse Effects Library... to pick one), background and border.
- Zoom: turn on Enable End Position to move smoothly from one view of the picture to another; position the boxes by dragging them on the canvas.
- Mosaic: pixel size (how coarse the blur is). Mark only (no pixelation) just marks the area without covering it.
- Speed: the speed factor (2 means twice as fast), plus the new length.
- Subtitle: edit this line's text directly.
Every block has Copy Selected Block and Delete Selected Block at the top.
Style & Canvas
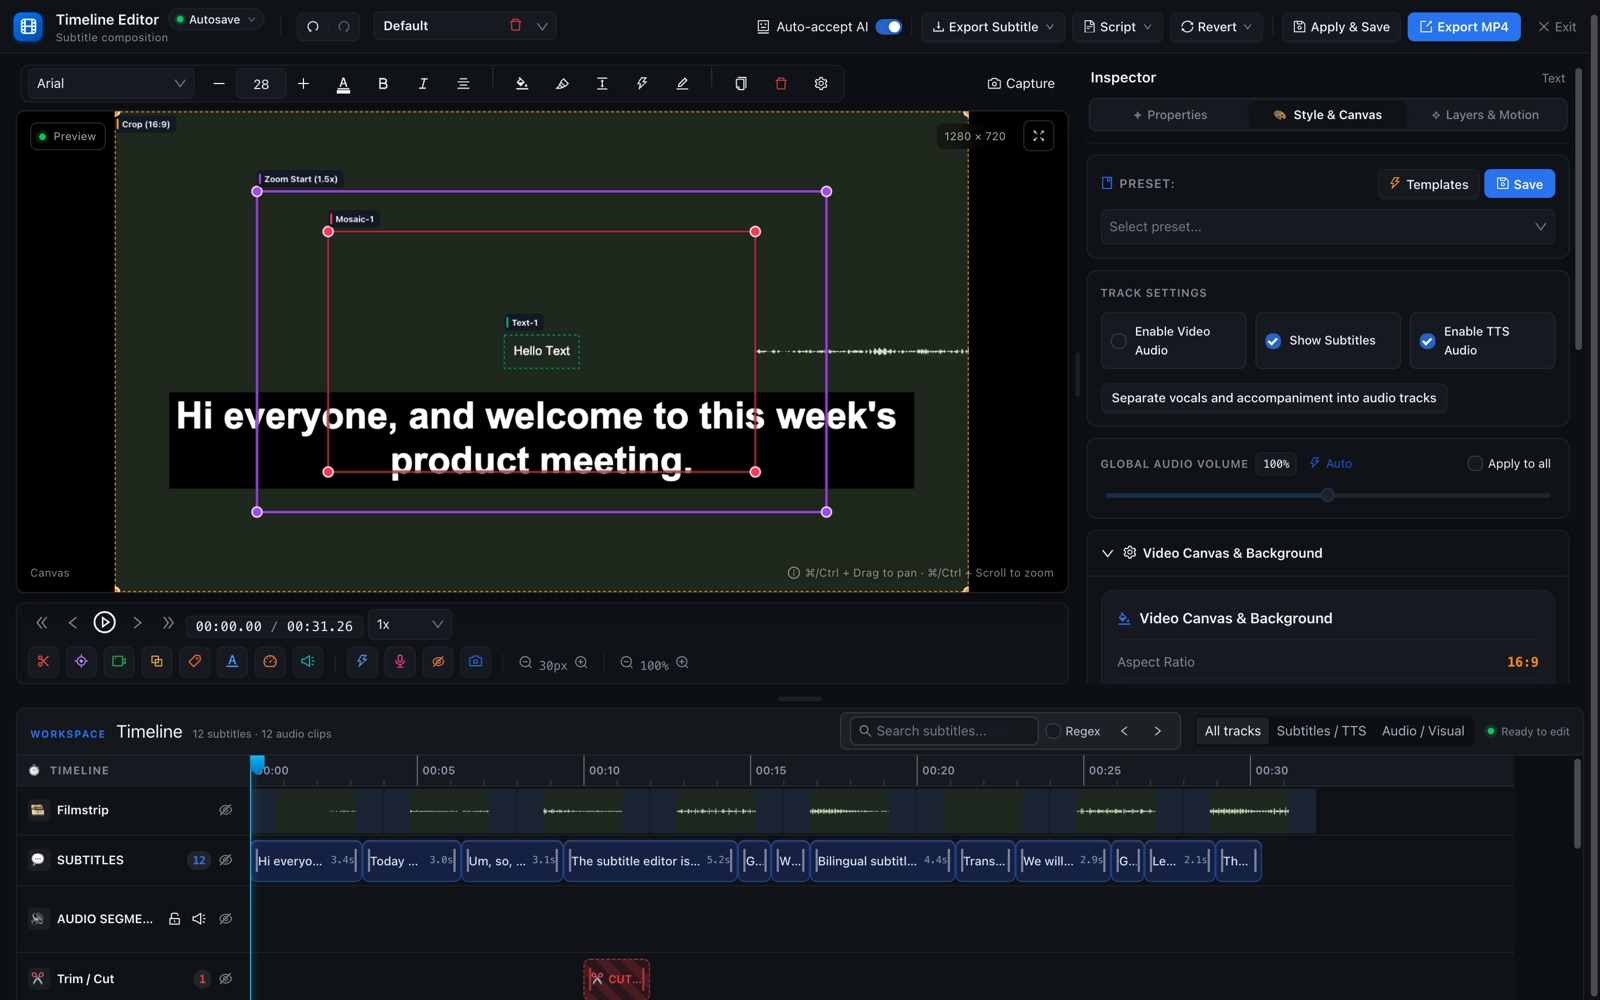
Settings for the whole video:
- Track Settings: whether to keep the video's own sound, show subtitles and play the TTS voice-over. Separating vocals and accompaniment puts voices and background music on separate tracks so you can set their volumes separately (download the model first in Settings › Models › Audio Separation).
- Video Canvas & Background: the aspect ratio (9:16 vertical, 16:9 horizontal, 1:1, 4:3) and the background style (crop fill, blurred background, black bars and so on). This is where you turn a horizontal video into a Reel or Short with 9:16.
- Typography & Language: normal subtitles, bilingual subtitles or word-by-word highlighted subtitles, plus font, color and position.
- Karaoke & Chapter Progress: shows a chapter progress bar; AI can create the chapters for you.
- Preset and Templates at the top: save a style you like and apply it in one click next time.
Layers & Motion
Add motion graphics (animated titles, charts, end cards and so on):
- Use a template (recommended for beginners): click Add motion graphic and pick one from the templates.
- Have AI make one for you:
- Click Write code.
- Describe the animation you want, for example "a blue title 'New version launches at the end of the month' sliding in from the left".
- Click Open ChatGPT or Copy prompt and give the prompt to ChatGPT or another AI.
- Copy the AI's reply, go back to Scribis and click Paste reply.
- If the preview looks right, click Save and add….
The Layers list below sets what sits on top of what.
13.5 The timeline: stacked tracks
From top to bottom: Filmstrip, Subtitles, Audio segments (TTS), Trim / Cut, Mosaic effect, Badge & Arrow, Zoom effect, Camera layout, Text overlay, Speed FX, Audio Mix, plus any audio or visual tracks you add yourself. The Zoom effect track holds the blocks added with 🎯 Zoom, and the Camera layout track holds the blocks added with 🎥 Multi Cam. Audio segments (TTS) are the AI voice-overs (TTS means "text-to-speech").
- Click a block to select it. Hold
Shiftand click to select a whole range, or hold⌘(Windows:Ctrl) and click to select several. - Drag a block to move it, and drag its left or right edge to change its length. Edges snap to nearby blocks and to the playback position.
- Click an empty spot to move the playback position there.
- Small icons next to each track name: lock (so you don't change it by accident), mute, delete (only tracks you added), and hide (only hides it from view; it doesn't affect the result).
- Search subtitles... at the top finds subtitle text; press
Enterto jump to the next match. Regex is an advanced search you usually don't need. - All tracks / Subtitles / TTS / Audio / Visual: show only some kinds of tracks for a tidier view.
13.6 Keyboard shortcuts
When nothing is selected, the Inspector lists common shortcuts. Click All shortcuts (?) (or press ?) for the full list.
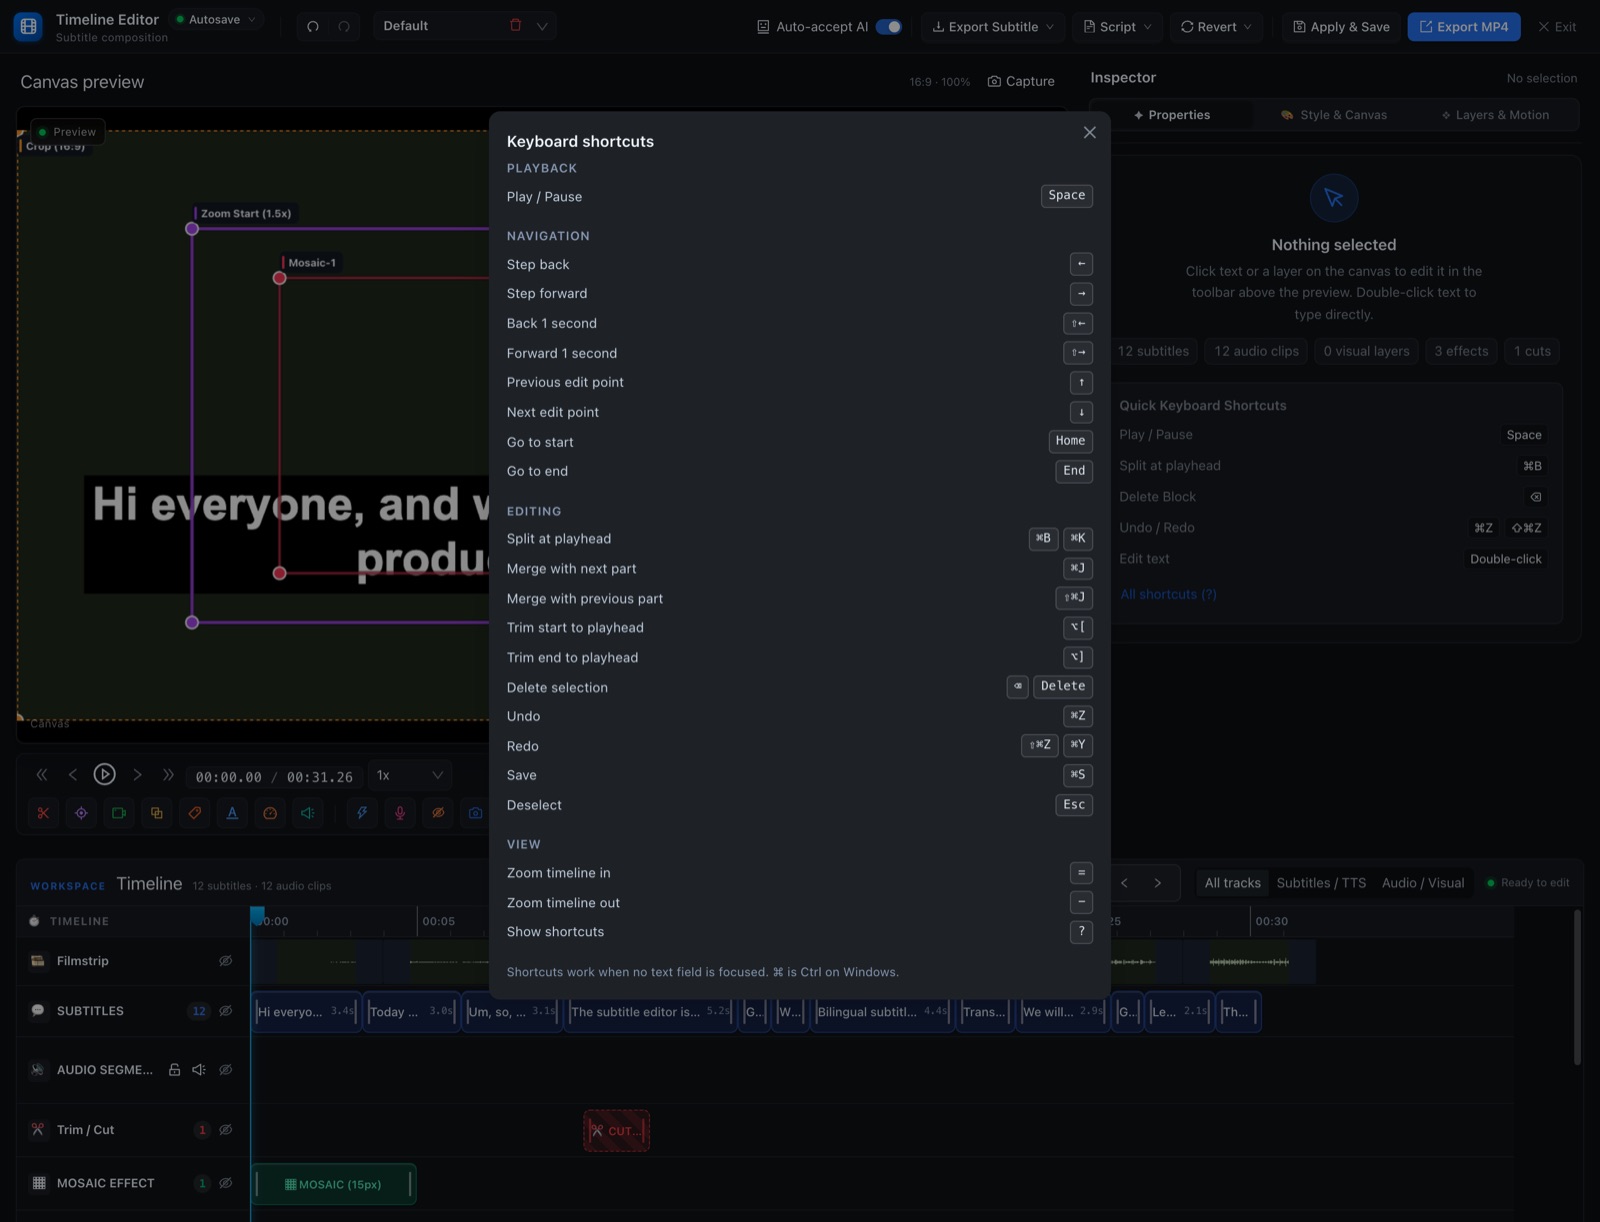
| Action | Mac | Windows |
|---|---|---|
| Play / pause | Space |
Space |
| Step back / forward a little (0.1 second) | ← / → |
← / → |
| Back / forward 1 second | ⇧ + ← / ⇧ + → |
Shift + ← / Shift + → |
| Previous / next edit point | ↑ / ↓ |
↑ / ↓ |
| Split at the playback position | ⌘ + B |
Ctrl + B |
| Delete what's selected | Delete |
Delete |
| Undo / redo | ⌘ + Z / ⇧ + ⌘ + Z |
Ctrl + Z / Ctrl + Shift + Z |
| Save | ⌘ + S |
Ctrl + S |
| Deselect | Esc |
Esc |
| Zoom the timeline in / out | = / - |
= / - |
💡 Shortcuts don't work while you're typing in a text field. Split only works on images, videos, motion graphics or music you've added, not on subtitles or TTS.
13.7 Export the video
💡 Two ways to get an MP4: if you only want the subtitles printed onto the video, with no editing, use Subtitle and Text Export › Video with Burned-in Subtitles (MP4) in the subtitle editor (Chapter 4, section 4.6). If you've cut the video or added effects, use Export MP4 here.
Click Export MP4 at the top right. Scribis processes the picture and exports the video, then asks where to save the file. You can click Stop Export at any time. Export creates the video file but does not save your edits. When the export finishes, click Apply & Save (or Autosave › Save Now to stay in the editor).
The finished video includes: cuts, speed changes, zooms, multi cam, aspect ratio and background, mosaics (except "mark only" ones), badges and arrows, text, motion graphics, subtitles (if Show Subtitles is on), and the original sound, TTS voice-over and background music.