Custom Voice Design & AI Video Dubbing with Qwen3-TTS in Scribis
Learn how to create custom voices, clone reference audio, translate subtitles, and generate AI video dubbing using Qwen3-TTS on Mac with Scribis.
Scribis pairs with Qwen3-TTS to let you create custom voices, generate multilingual speech, and apply generated voices directly to your video dubbing workflow on Mac.
What You'll Learn
In this tutorial, you will master the complete voice design and AI video dubbing workflow using Scribis and Qwen3-TTS:
- Installing Qwen3-TTS models (VoiceDesign and Base)
- Designing brand new AI voices using text descriptions
- Creating custom voices or cloning speech using reference audio
- Previewing and saving custom voices to Native Voices
- Transcribing and translating video subtitles
- Assigning dedicated voices to different speakers in Speaker Mode
- Synthesizing AI speech and re-syncing to the video timeline
Before You Begin
This workflow primarily relies on two Qwen3-TTS models:
Qwen3-TTS 1.7B VoiceDesign
Used for creating new custom voices. You can describe desired voice traits—such as tone, style, or expressiveness—using natural language prompts.
Qwen3-TTS 0.6B Base
Used for generating final speech output. Once a voice profile is created, Scribis uses the Base model to synthesize text into actual audio.
To utilize both Voice Design and video dubbing features seamlessly, it is recommended to download both models.
Step-by-Step Guide
1. Install Qwen3-TTS Models
First, open Scribis and navigate to:
Settings → Model Selection
Locate Qwen3-TTS under model management and download:
Qwen3-TTS 1.7B VoiceDesignQwen3-TTS 0.6B Base
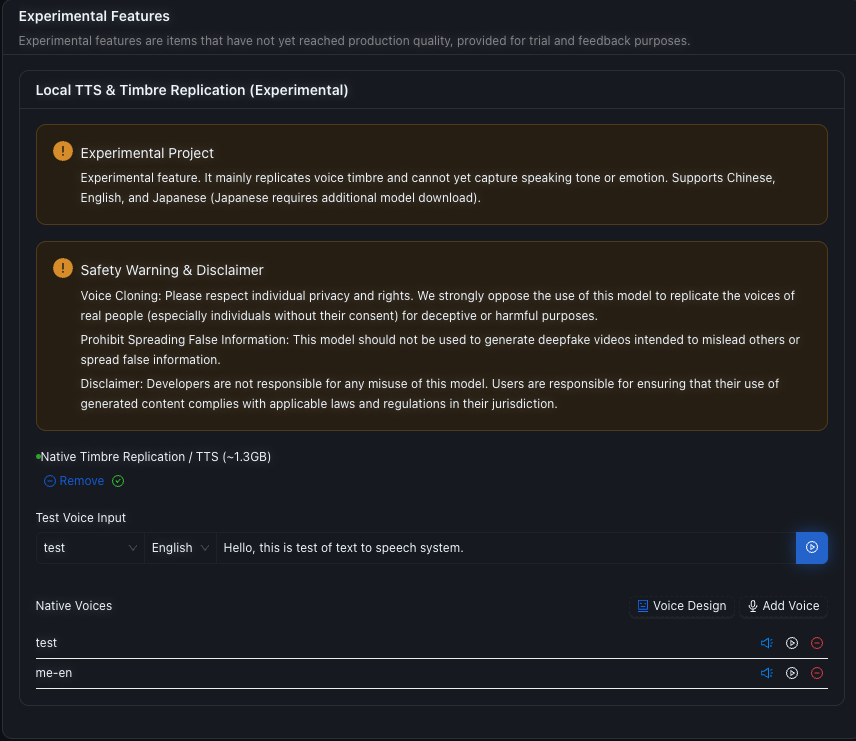
VoiceDesign handles voice creation, while the Base model handles final text-to-speech synthesis.
2. Open Voice Design
Next, head to:
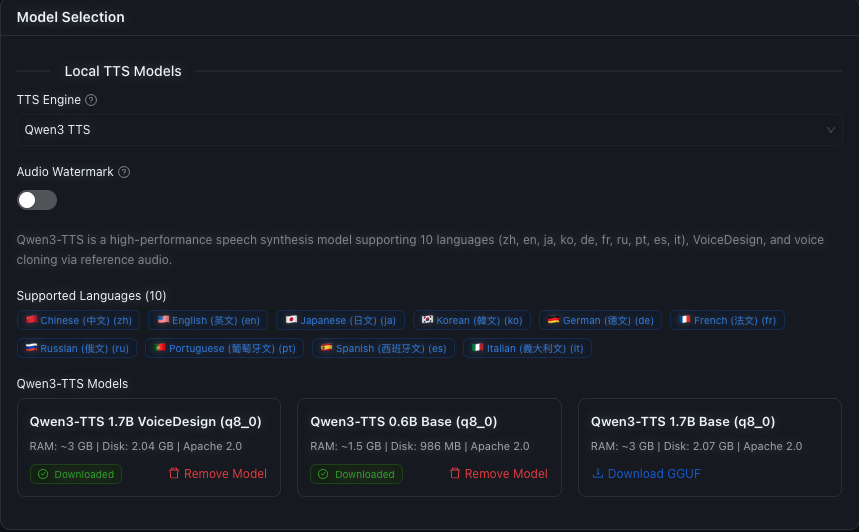
Experimental Features → Voice Design
Voice Design is Scribis's dedicated tool for managing custom AI voices. Currently, you can create voices via two methods:
- Text descriptions
- Voice recordings or reference audio files
3. Create Voices via Text Descriptions
If you don't need to replicate an existing voice, describe your target voice in natural language. For example:
A warm and calm male narrator with a clear voice and slightly slow speaking pace.
Or:
A young female voice with an energetic and friendly presentation style.
Qwen3-TTS VoiceDesign generates new voice characteristics based on your prompts. This method is ideal for:
- YouTube narrations
- Tutorial videos
- Podcasts
- Virtual avatars / AI presenters
- Original non-personified AI voices
4. Create Custom Voices with Reference Audio
In addition to text prompts, you can also use your own audio recordings as references. Inside Voice Design:
- Record a short audio snippet, or
- Upload an existing audio file
Scribis uses this reference audio to build your custom voice clone. This is perfect for maintaining a consistent narrator voice across multiple video projects.
Please only clone voices for which you own the rights or have explicit permission to use.
5. Preview Your Voice
After generating a voice profile, you don't need to apply it to a video immediately. Input test sentences such as:
Welcome to Scribis. Today we're going to learn how to create multilingual video dubbing.
Synthesize and preview the audio directly inside Scribis. Test a variety of sentence structures—including short phrases, long paragraphs, questions, numbers, and multiple languages—to ensure quality.
6. Save to Native Voices
When you're satisfied with the voice output, save it to Native Voices.
Once saved, the voice becomes reusable across all future video, subtitle, and dubbing projects without requiring re-generation. You can organize profiles like:
- Narrator
- Host
- Male Speaker
- Female Speaker
- Character A / B
7. Select Your Video for Dubbing
Navigate to the Media Library and select the video you want to dub.
Scribis transcribes original spoken audio into timestamped subtitle segments following this pipeline:
Video → Transcription → Timed Segments → Translation → TTS → Dubbed Audio
Timestamp alignments are preserved so generated audio syncs perfectly back to the video timeline.
8. Translate Video Subtitles
Translate the transcribed subtitles into your target language (e.g., English to Traditional Chinese, Japanese, or other languages supported by Qwen3-TTS). Timecode structures remain locked during translation.
9. Enable Speaker Mode
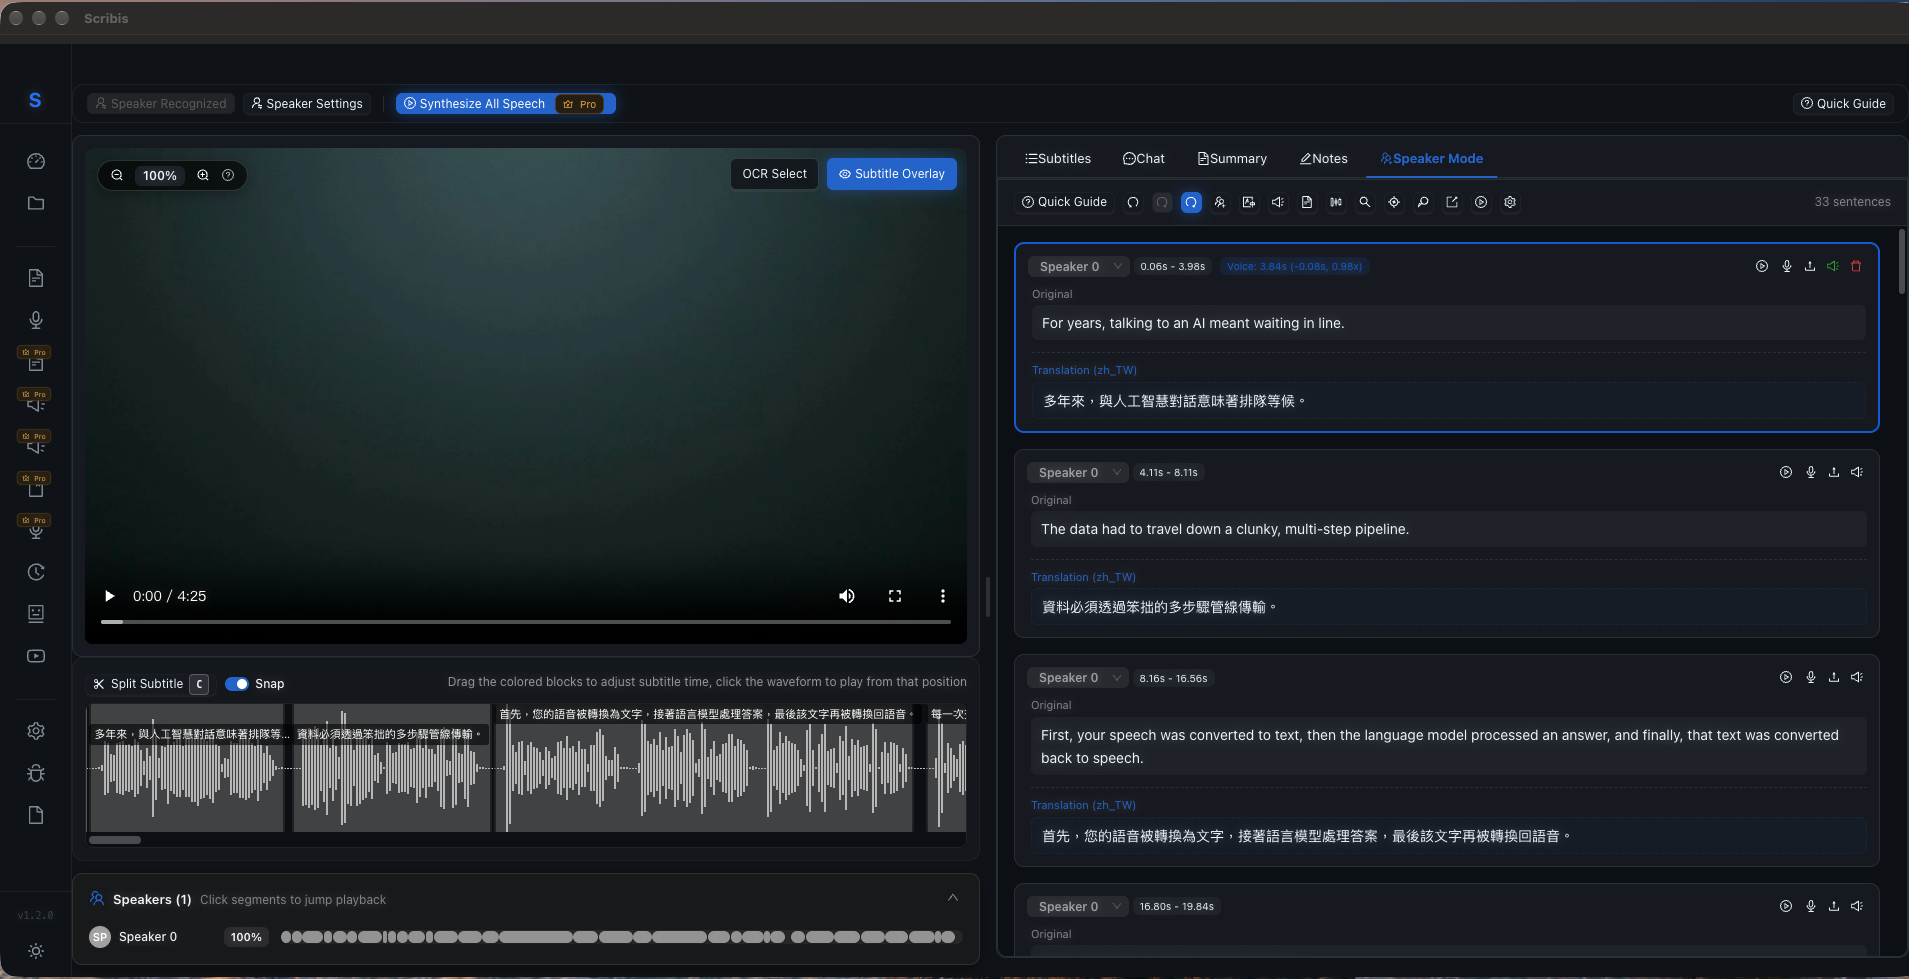
Switch to Speaker Mode and open Speaker Voice Settings. Assign specific voice profiles to each identified speaker:
For single-speaker videos:
Speaker 1 → My Custom Voice
For multi-speaker interviews:
Speaker 1 → Voice A
Speaker 2 → Voice B
Speaker 3 → Voice C
10. Assign Custom Voices to Multiple Speakers
Speaker Voice Settings enables distinct character vocal identities for podcasts, panel discussions, interviews, and multi-role media:
| Speaker | Voice |
|---|---|
| Host | Custom Voice A |
| Guest | Custom Voice B |
| Narrator | Custom Voice C |
11. Synthesize Translated AI Dubbing
Click Synthesize All Speech. Scribis processes translated text, speaker assignments, and timestamp markers through Qwen3-TTS:
Translated Subtitle + Speaker Voice + Subtitle Timing
                      ↓
                  Qwen3-TTS
                      ↓
               Generated Speech
Each subtitle segment produces corresponding synchronized audio chunks.
12. Re-sync to Video Timeline
Generated audio segments automatically align back to original subtitle timecodes:
Original:
00:01:20 → 00:01:24
Welcome to our channel.
Translated & Synthesized:
歡迎來到我們的頻道。
Audio playback timing maintains original video pacing and video-audio alignment.
Full End-to-End Workflow
Download Qwen3-TTS
        ↓
Voice Design
        ↓
Create / Clone Voice
        ↓
Preview Voice
        ↓
Save to Native Voices
        ↓
Import Video
        ↓
Transcribe
        ↓
Translate
        ↓
Speaker Mode
        ↓
Assign Voice
        ↓
Synthesize
        ↓
Sync to Timeline
        ↓
Dubbed Video
FAQ & Key Concepts
Voice Design vs. Voice Cloning
- Voice Design: Creates synthetic voices purely from descriptive text prompts without existing audio samples.
- Voice Cloning (Reference Audio): Replicates vocal nuances from an uploaded audio sample or direct microphone recording.
Both output types save directly to Native Voices for seamless reusability.
Key Advantages of Integrated AI Dubbing
Instead of exporting SRT files, editing audio in external DAWs, and manually re-aligning timelines, Scribis consolidates Transcription → Translation → Speaker Diarization → Voice Creation → TTS → Video Synchronization into a single native Mac workflow.
Recommended Use Cases
- YouTube multilingual channels
- Online courses & educational content
- Podcasts & interview dubbing
- Product demos & presentation voiceovers
- AI Avatar & character dubbing
Summary
With Scribis and Qwen3-TTS, you can execute the complete video dubbing lifecycle locally on Mac:
Voice Design + Voice Cloning + Speech-to-Text + Subtitle Translation + Speaker Diarization + Local TTS + Video Dubbing
Save your favorite voice profiles to Native Voices and create professional localized videos effortlessly in one unified application.